Handy chart for converting N-m to In-lbs
1 = 8.85        32 = 283.22     63 = 557.60      94 = 831.97      125 = 1106.34
2 = 17.70       33 = 292.07     64 = 566.45      95 = 840.82      126 = 1115.19
3 = 26.55       34 = 300.93     65 = 575.30      96 = 849.67      127 = 1124.04
4 = 35.40       35 = 309.78     66 = 584.15      97 = 858.52      128 = 1132.90
5 = 44.25       36 = 318.63     67 = 593.00      98 = 867.37      129 = 1141.75
6 = 53.10       37 = 327.48     68 = 601.85      99 = 876.22      130 = 1150.60
7 = 61.96       38 = 336.33     69 = 610.70      100 = 885.07     131 = 1159.45
8 = 70.81       39 = 345.18     70 = 619.55      101 = 893.93     132 = 1168.30
9 = 79.66       40 = 354.03     71 = 628.40      102 = 902.78     133 = 1177.15
10 = 88.51      41 = 362.88     72 = 637.25      103 = 911.63     134 = 1186.00
11 = 97.36      42 = 371.73     73 = 646.10      104 = 920.48     135 = 1194.85
12 = 106.21     43 = 380.58     74 = 654.96      105 = 929.33     136 = 1203.70
13 = 115.06     44 = 389.43     75 = 663.81      106 = 938.18     137 = 1212.55
14 = 123.91     45 = 398.28     76 = 672.66      107 = 947.03     138 = 1221.40
15 = 132.76     46 = 407.13     77 = 681.51      108 = 955.88     139 = 1230.25
16 = 141.61     47 = 415.99     78 = 690.36      109 = 964.73     140 = 1239.10
17 = 150.46     48 = 424.84     79 = 699.21      110 = 973.58     141 = 1247.96
18 = 159.31     49 = 433.69     80 = 708.06      111 = 982.43     142 = 1256.81
19 = 168.16     50 = 442.54     81 = 716.91      112 = 991.28     143 = 1265.66
20 = 177.01     51 = 451.39     82 = 725.76      113 = 1000.13    144 = 1274.51
21 = 185.87     52 = 460.24     83 = 734.61      114 = 1008.99    145 = 1283.36
22 = 194.72     53 = 469.09     84 = 743.46      115 = 1017.84    146 = 1292.21
23 = 203.57     54 = 477.94     85 = 752.31      116 = 1026.69    147 = 1301.06
24 = 212.42     55 = 486.79     86 = 761.16      117 = 1035.54    148 = 1309.91
25 = 221.27     56 = 495.64     87 = 770.01      118 = 1044.39    149 = 1318.76
26 = 230.12     57 = 504.49     88 = 778.87      119 = 1053.24    150 = 1327.61
27 = 238.97     58 = 513.34     89 = 787.72      120 = 1062.09    151 = 1336.46
28 = 247.82     59 = 522.19     90 = 796.57      121 = 1070.94    152 = 1345.31
29 = 256.67     60 = 531.04     91 = 805.42      122 = 1079.79    153 = 1354.16
30 = 265.52     61 = 539.90     92 = 814.27      123 = 1088.64    154 = 1363.01
31 = 274.37     62 = 548.75     93 = 823.12      124 = 1097.49    155 = 1371.87
Mandatory pre-load weight for suspension alignment
- Each front seat 68 kg (150 Ib)
- Center of rear seat 68 kg (150 Ib)
- Trunk 21 kg (46 Ib)
- Fuel tank full
Torque specifications
Engine
- Engine mount to engine bracket or subframe: (M10) 47 Nm (35 ft-lb)
- Fan to viscous clutch: 10 Nm (89 ft-lb)
- Clutch nut to coolant pump (left·hand thread):
- Without BMW tool no. 11 5040 40 Nm (30 ft-lb)
- With BMW tool no. 11 5040 30 Nm (22 ft-lb)
- Coolant pump pulley to coolant pump: 10 Nm (89 in-lb)
- Thermostat housing to coolant pump: 10 Nm (89 in-lb)
- Vibration damper to crankshaft hub: 22 Nm (17 ft-lb)
- Huge nut on vibration dampener: 100Nm
Oil filter & pan
- Oil filter line to upper oil pan: 30Nm
- Lower oil pan bolts: 10Nm
- Upper oil pan to engine: 10Nm regular / 20 Nm long bolt
Suspension
- Thrust arm ball joint to steering arm: 68 ft-lb
- Thrust arm to cross member: 127 Nm (94 ft-lb)
- Control arm ball joint to steering arm: 93 Nm (68 ft-lb)
- Control arm to cross member: 78 Nm (57 ft-lb)
- Strut housing to steering arm (use Loctite 270-' or equivalent): 110 Nm (81 ft-lb)
- Pitman arm to steering gear: 59 Nm
- Steering arm to front axle carrier (self-locking nut): 42 Nm (32 ft-lb)
- Stabilizer bar mounting brackets to subframe: 22 Nm (16 ft-lb)
- Stabilizer link to strut housing or stabilizer bar: 59 Nm (43 ft-lb)
- Tie rod end to steering arm or center tie rod: 37 Nm (28 ft-lb)
- Tie rod end clamping bolt: 14 Nm (10 ft-lb)
- Center tie rod to outer tie rod ends: 37 Nm (28 ft-lb)
- Center tie rod to pitman arm: 59 Nm (44 ft-lb)
- Center tie rod to idler arm: 37 Nm (28 ft-lb)
- Front cross member to body (Large bolt on bracket):
- M14x1.5 8.8 143 Nm (ft. lbs.)
- M14x1.5 10.9 200 Nm (ft. lbs.)
- M14x1.5 12.9 240 Nm (ft. lbs.)
Power steering
- Pulley to pump (3 bolts): 15 Nm
- Front bolts connecting pulley to engine: 25 Nm
- Big power steering line in rear of the pump M18: 45 Nm
- Smaller power steering line on the side of the pump M14: 42 Nm
- Top nut on gearbox going into cooler M16 banjo bolt: 40 Nm (30 ft-lb)
- Steering gearbox to subframe cross member:
- M10 bolt (class 10.9 bolt only) 42 Nm (32 ft-lb) From top
- M12 bolt 85 Nm (63 ft-lb) Goes through horizontally
- Steering column universal joint to steering gearbox shaft (self-locking nut): 22 Nm (16 ft-lb)
Subframe
- Front axel support to chassis
- M10-8.8 bolts 42 Nm (31 ft-lb)
- M10-9.8 bolts 47 Nm (35 ft-Ib)
- M12 bolts 77 Nm (57 ft-lb)
- Rear / Collar screw: 59 Nm
Rear axle
- Rear axle carrier to rear rubber mount: 77 Nm
- Rear mounts to the body (Thread free from oil and grease and secure with Loctite No. 270): 45 Nm
Transmission
- Transmission to engine (Torx-head):
- M8 23 Nm (17 ft-Ib) Top
- M10 43 Nm (32 ft-lb) Regular
- Rear transmission support to body (bolt) 23 Nm (17 ft-lb)
- Rubber mount to transmission or bracket (nut) 43 Nm (32 ft-lb)
- Transmission drain plug/fill plug 50 Nm (37 ft-lb)
Troubleshooting excessive drive train vibration
Mechanical
- Check engine mounts
- For manual cars:
- If the shifter pulls to the passenger side, inspect the driver side engine mount
- If the shifter pulls towards the driver side, inspect the passenger side engine mount
- For manual cars:
- Check transmission mounts
- Check differential mounts
- You might also hear a clunking sound coming from the rear during acceleration
- Check shifter bushings
- Check the pulleys on the v-belt, including the harmonic balancer
- Perform a leak down test to verify engine compression
- If your car was recently serviced:
- Engine work that required timing adjustment:
- Check engine timing
- Clutch work:
- Improperly surfaced or misaligned flywheel
- Aftermarket lightweight flywheel that is severely out of specification
- Engine work that required timing adjustment:
Electrical
- General misfire condition
- Pull,inspect and replace the spark plugs
- Check the ignition coils
- Check the oxygen (02) sensors
- If the idle doesn't hold steady or if the car sounds like it's trying to catch a breath when you stop:
- Check the Idle Control Valve (ICV)
- Check the Mass Air Flow sensor (MAF)
- Check the intake system for vacuum leaks
- Rule-out the DME/ECU by temporary swapping in a known functional unit
Fan clutch
A failing fan clutch or damaged fan can cause all sorts of problems.
- Make sure the vehicle is off, and the battery is unplugged.
- Check for missing blades on the radiator fan
- Check the health of the radiator fan, look out for cracks and chips
- Check the fan clutch for excessive play to make sure the water pump bearing is nice and tight
- Start the car and perform a newspaper test on the clutch
- Let the car warm up until the clutch engages, then watch the alignment as you feather the throttle
Constant Radiator Damage
motor mounts and consensor mount
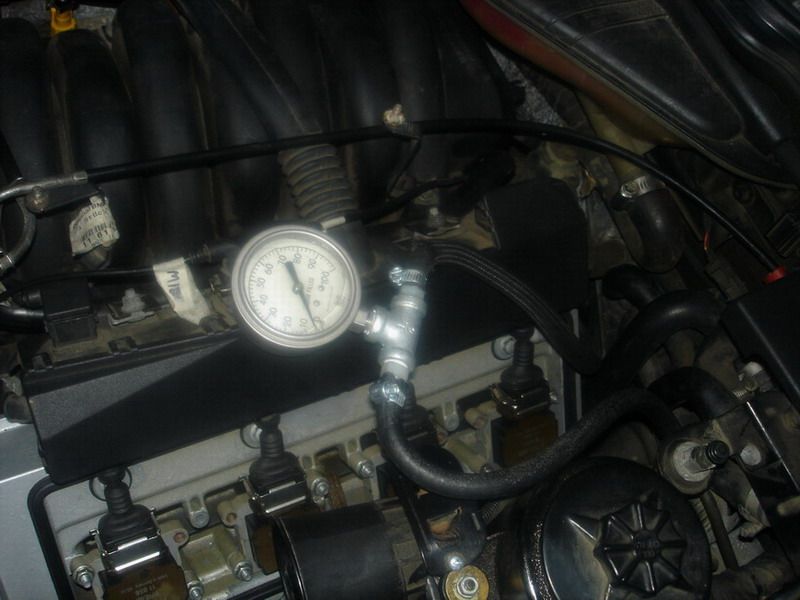
Checking the Fuel Pressure
Setup
You can tap in a fuel pressure gauge in the line going into the fuel rail from the driver side. Locate the fuse box near drive side mount and look behind it. You should see a metal fuel line connected with a clamp to a fuel hose running to the metal fuel rail on top of the engine.
- Start the car
- Remove fuse number #22 (fuel pump), and wait for the car to choke
- Shut off the car and unplug battery (safety)
- Unscrew the clamp and take out the hose from metal rail near fuse box
- Put the hose into a pressure gauge on one end and use a piece of new fuel hose on another end and clamp it to the metal fuel line
- Make sure everything is tight
- Turn on the ignition in position number one to begin priming the pump at low pressure. Check for leaks
- Attempt to start the car by turning it over for 2-4 seconds at a time. You should check for system leaks between the attempts. The E34 will require about 4-5 attempts before the fuel pressure is up to the specification
- Read the fuel gauge
Specifications
- 3.5 BAR, +/- .02 BAR
- 50 PSI, +/- 3 PSI
Testing for leaks
After testing the fuel pressure, shut the car off and write down the current fuel pressure. Wait 20 minutes; the pressure should not drop more than 0.5 BAR.
If it does, you have a leak or faulty fuel pump check valve.
Stumble / Hesitation Upon Starting
Overview[edit]
This section will attempt to identify possible elements causing hesitation or stumble when starting the car.
Basic Maintenance[edit]
The first thing is to see when was the last time you performed basic maintenance. Make sure your spark plugs, oil, coil, and coil boots are in check. Running summer oil in winter will cause the engine to turn over at a slower rate.
Battery / Alternator[edit]
- Check the battery acid level
- Clean the battery terminals and make sure the connectors are not-rusted and tight
- Check the negative battery cable and make sure the other end is making proper contact with the car frame
- Check the voltage across the battery terminals
- Check the belt driving your alternator, a loose belt will slow down the battery recharging process
- Turn on your high beams and start the car, if they dim then your battery does not have enough charge for proper vehicle operation
- Get a free alternator and battery load test at your local auto parts store (do not forget to tip)
Air / Fuel Mixture[edit]
- Inspect the vaccume system for air leaks
- Test the fuel pressure
- Replace filteration components for air and fuel
Rear Main Oil Seal[edit]
Leaking rear main oil seal will coat your starter in oil. Jack up the car and look at the starter. If it is covered in oil, use an electrical cleaner and spray it all over the starter to get you moving. Inspect condition of starter wiring.
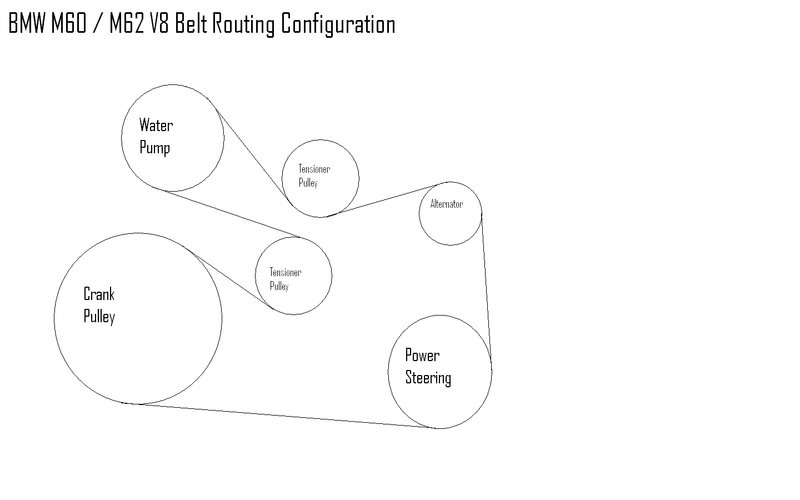
V-Belt Replacement
Overview
V-Belts are critical for proper vehicle operation. You will want to replace the AC compressor belt and inspect your pulleys.
Tips
To get proper clearance to tighten the tensioner, put a 17mm socket on the plate followed by a long+flat wrench with a small extension (just enough to not to hit the fan, if you lack space take off the fan).
Put a spark plug socket on top of the wrench with an extension attached to give you more leverage.
From driver side, push the extension forward while using a smaller wrench to tighten up the bolt securing tensioner plate in place.
Torque Specs
Two 13mm bolts for adjusting pulley/tensioner: 22 Nm
Diagrams
How to troubleshoot blown strut mounts
Symptoms
Bushings wear up at a much higher rate. The strut is not leveled. The strut might pop-out from the base, damaging your hood.
Stock / OEM
Check your springs, shocks, and the shock observers for failure or signs of excessive wear.
Lowered / Aftermarket
If your car is lowered and the strut mounts are regularly failing, you may want to consider running a set of KMAC camber plates. Be warned that the camber plates will redirect some of the force back to other components. Make sure that your strut tower is structurally sound.
Brands
When it comes to parts, the brand matters. Always use OEM strut mounts, do not use aftermarket parts. Especially if you have wheels that are over 17 inches.
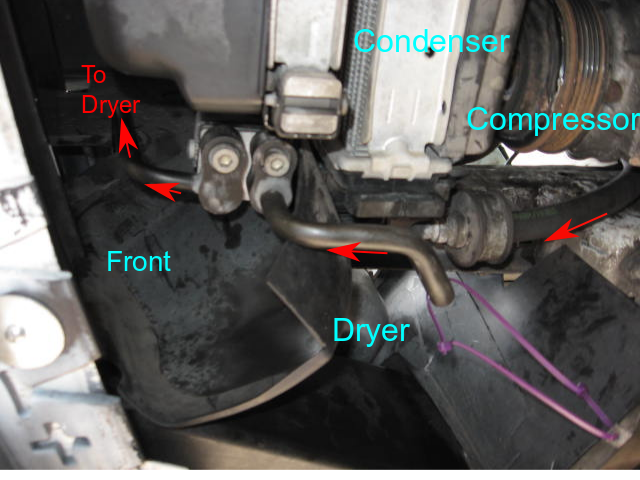
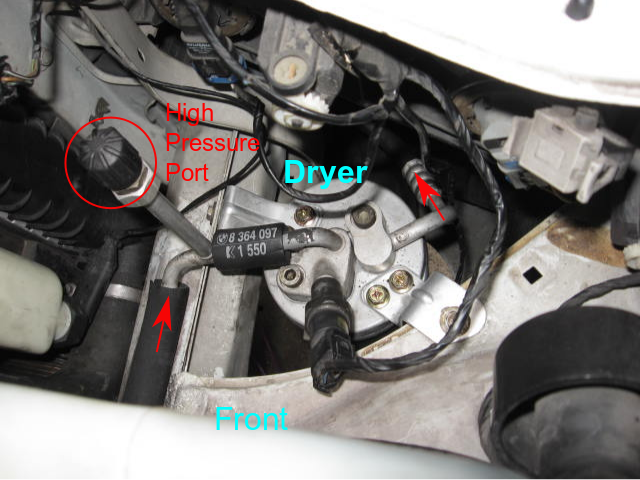
Layout of A/C Condenser Lines
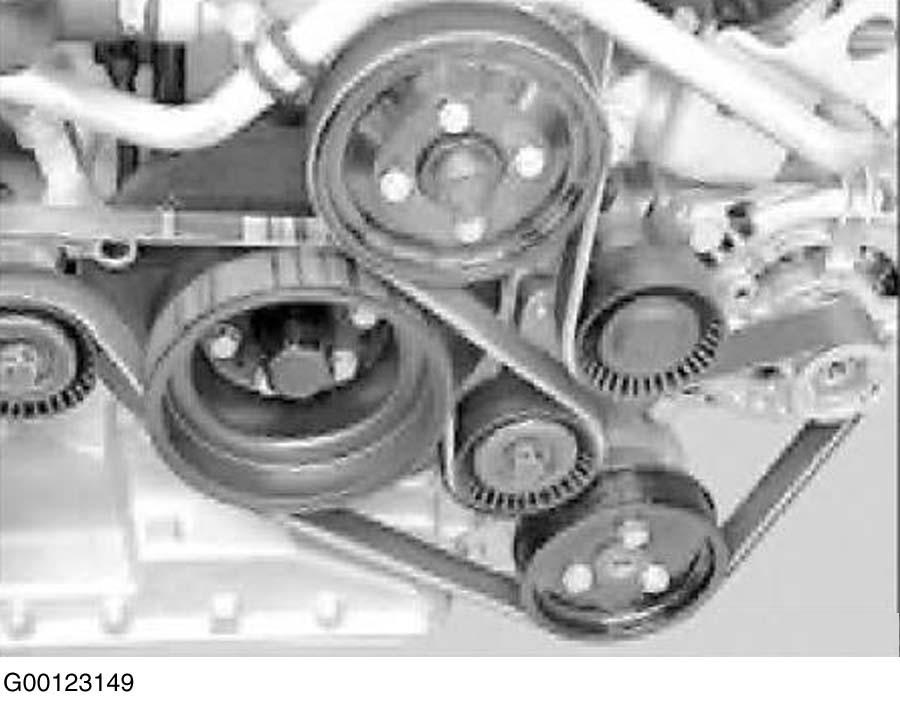
How to Inspect Pulleys
Overview
In this section, we will cover inspection of pulleys on the M60B40 engine. The general principals apply elsewhere.
Preparation
Before inspecting pulleys you must remove your V-Belt/AC compressor belt.
The Basics
- If the pulley spins freely, bearing has failed. If pulley has no bearing the accessory has failed (power steering pump pulley is attached to an internal pulley within power steering pump)
- If it spins freely that means you have a power steering pump on the way out. It is highly recommended to replace the pulley.
- If it is tough to spin; it is also an indication of a failed bearing/seized pulley. You may try to clean the pulley (or do the old hit until it works trick) however, replacement is advised.
- If pulley makes grinding/whining sound while you are spinning it by hand. You must replace it.
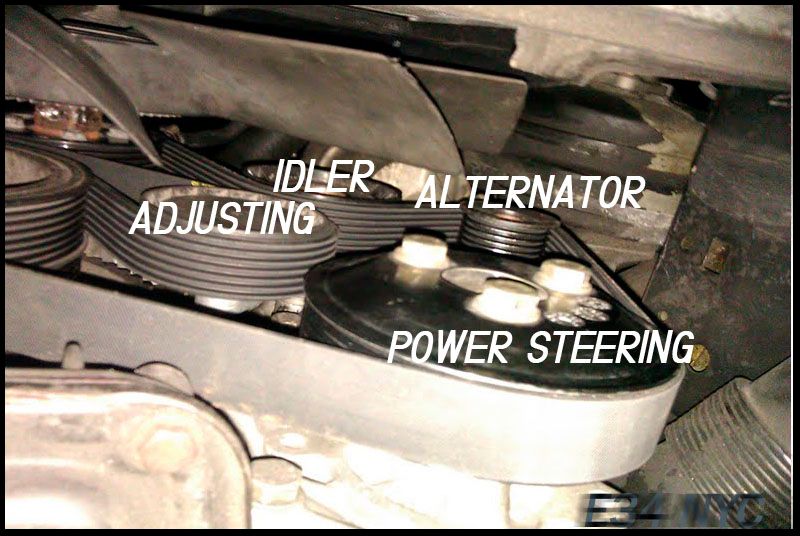
Inspection
- Spin power steering pulley located on bottom right of the oil pan, check for signs of failure described above. Attempt to move it back and forth. An only slight play is acceptable.
- Spin the alternator pulley (located on top right of the power steering pulley) check for signs of failure described above. No play is acceptable when moving it back and forth.
- Spin AC compressor pulley. It should not bind or grind at any point.
- Check the water pump pulley. There should be no play when moving it back and forth.
- Inspect idler and adjusting pulleys. The common failure indicator is grinding sound when they are spun. Both of the pulleys in question will often spin freely when failed .vs seizing.
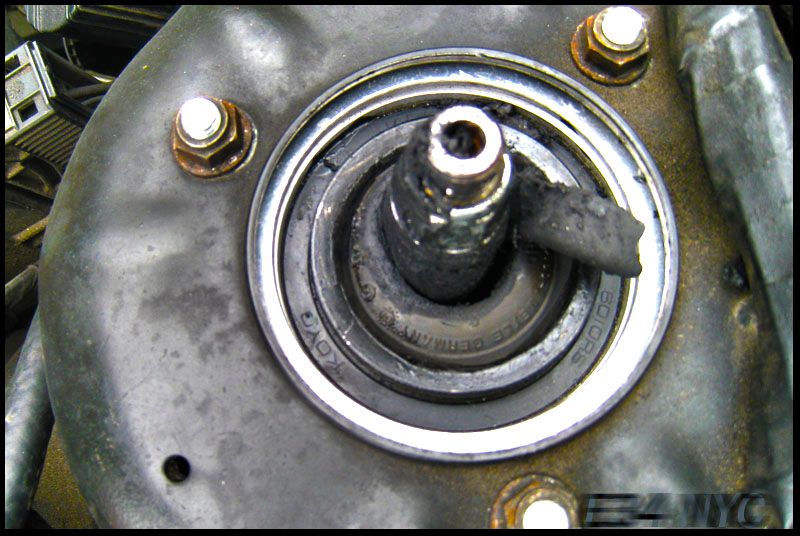
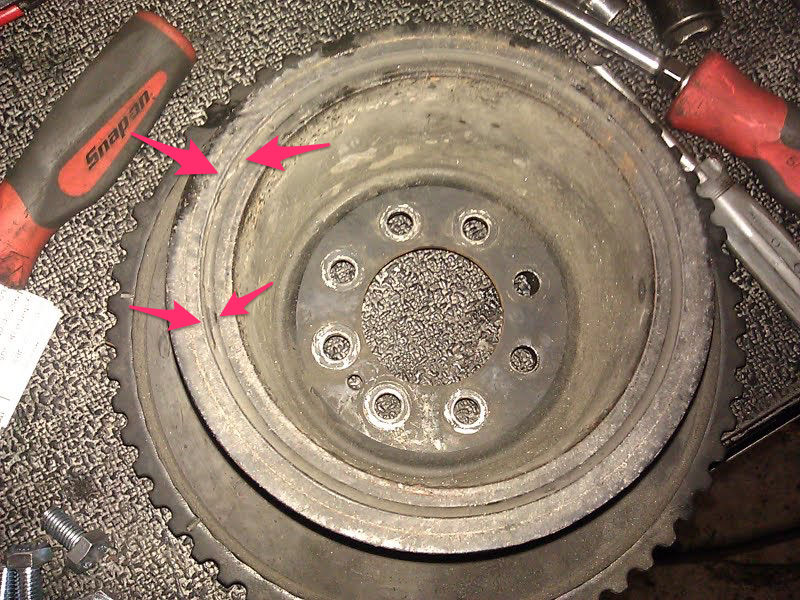
Harmonic Balancer
Failure of harmonic balancer will damage all of the accessories including your power steering pump, alternator, water pump, tensioners, and pulleys. A worn or cracked harmonic balancer will create an unnecessary amount of engine vibration.
Diagnostic
Start the car and look at harmonic balancer (the big pulley located under the water pump. Your crankshaft position sensor will point directly at the metal teeth of this pulley. If any wobble or shake is emitted, turn off the car and check for 8 bolts holding the harmonic balancer in place. If any of those bolts are missing, replace and repeat procedure.
Video
Note
A faulty balancer will cause an excessive load on the V-belt system. You must inspect all of the accessories and at very minimum replace the belt, tensioner, and the pulleys.
Water Pump
Caution: Do not remove the coolant reservoir or radiator cap with the engine hot. Undoing either could spray hot coolant and cause burns or damage the engine
Overview[edit]
In this section, we will cover inspection of the water pump and basic replacement procedure.
Inspection[edit]
- Inspect the water pump for visible leaks at gasket and thermostat level
- If the thermostat fails to open, the hose leading to the pump from the radiator (passenger side) will get extremely hot at a normal operating temperature
- Check the fan clutch for wobble. Take the belt off and check the pulley for play in all directions. There should no play in either direction
- The pulley should be spinning with slight resistance and stop after a couple of turns. Free spinning indicates excessive wear
Video Walkthrough[edit]
Parts Required[edit]
- A brand new water pump with a metal impeller. The pump should come with a gasket and 2 pipe o-rings. This component is critical to the vehicle operation and lifespan. Only use OEM or a quality aftermarket replacement
- 2 gallons of a BMW coolant and 2 gallons of distilled water
- Good silicon gasket maker for the water pump
- Blue Locktite
Optional Parts[edit]
While doing this job, you can also replace following:
- Fan clutch (highly recommended)
- Upper and lower radiator hoses (highly recommended)
- V-Belt and A/C belt
- Both tensioners
- Idler, adjusting, water pump, and power steering pulleys
Tools Required[edit]
- Drain pan
- 10mm, 12mm, 13mm, and 17mm sockets
- Two ratchets with short and longer extensions
- Rubber mallet
- 32mm thin wrench
- Torque wrench
- Screwdriver
Torque Specifications[edit]
- Pulley to the water pump: 10 nm
- Vibration damper to the crankshaft: 22 nm
- The thermostat housing to coolant pump: 10 nm
- Water pump to the timing chain cover 10 nm
Replacement[edit]
- Jack up the car
- Make sure the car is secured with jack stands and the rear wheels are chocked
- The vehicle should be completely cold. Place a drain pan under the driver side of the radiator and remove the drain plug. The plug is located on the bottom right side of your radiator (driver side).
- The fan clutch threads are reverse threaded
- Put a 32mm thin wrench on the fan clutch bolt (connected to the pump), and hold the water pump pulley with your hand while applying counter-clockwisepressure on the wrench to loosen up the bolt
- Try giving the wrench a wack or two with a rubber mallet to get things moving
- If the bolt is rusted or stubborn, you may need to get a special BMW pulley holder
- Once the bolt is off, spin the fan (counter-clockwise) until it slides off the threads. Make sure to catch it with your hands to prevent damage to the plastic blades
- Relief tension from the V-Belt and take it out
- Jack the car back down
- Remove the upper radiator (return) hose from radiator to engine block
- Remove the smaller (bleed) hose that runs from coolant reservoir to the top corner of the radiator
- Remove the lower radiator hose from radiator to the water pump
- Unplug the temperature sensor from the passenger side of radiator
- Push the radiator down and release two top side clips that secure the radiator to the frame
- Take out the radiator and safely place it away from the vehicle
- You may want to run a radiator cleaner or a water hose to clean out potential debris
- Using a rachet with a small extension unscrew all of the 13mm x 8 bolts from the harmonic balancer. Use a bigger rachet and tap it with a rubber mallet to loosen up the bolts
- Use the mallet to give a couple of love taps to the harmonic balancer, then take it off by pulling it forward
- Remove all of the 10mm bolts from the water pump. There are 2 long bolts located on the top left of the pump. The bolts should be opposite to each other. Note and label their position
Be careful as you do not want to unplug the metal pipes from the rear. You want to disconnect them from the pump as you pull it out instead!
- Hold the water pump and tap it lightly with a mallet, then carefully pull it forward while holding the two rear pipes in place
- Remove the water pump. Then take a sharp razor blade and scrape everything off the block. Spray a carb cleaner if necessary
- If you are also replacing the thermostat, put it on the new water pump (use blue Locktite). Use a silicon gasket (made for water pumps) where the thermostat makes contact with the pump
- Transfer (or use a new) water pump pulley to your new water pump
- Liberally apply the silicon gasket maker around the gasket mating surface (on the pump itself). Go around the bolt holes. Apply it to the top of the two pipes sticking out of the engine
- Put a new water pump gasket on top of the silicon you just applied and press it until it sticks
- Now the fun part. You have to put the new water pump back in straight and align all of the bolts while also aligning it with the engine (coolant) pipes. Careful to not to move the gasket you just attached.
- This might take few attempts. The trick is to have two longer bolts nearby with proper lighting. Slowly put the bigger pipe in the water pump first, then carefully maneuver the pump into a smaller pipe
- Slowly push the pump back to it is the place while looking at the bolt holes to gauge alignment. Do not force it
- You will feel feedback when the pump makes full contact with the rear coolant pipes
- Quickly put the two longer bolts back on the pump, and inspect both sides of water pump for misalignment. The gasket should not be sticking out
- You can repeat this procedure until the gasket is properly aligned
- The rest is reverse of removal. Use the blue Locktite on all of the water pump and harmonic balancer bolts
Bleeding[edit]
Warning: Do not add cold water or coolant to a hot engine. Engine damage could result from the sudden change in temperature
Caution: Do not remove the coolant reservoir or radiator cap with the engine hot. Undoing either could spray hot coolant and cause burns or damage the engine
Tip: Always use a 50/50 mix of BMW coolant and ionised (or distilled) water to refill the system
Fluid Specifications
- Fluid: 50% BMW anti-freeze / 50% distilled water
- M20 engine: 11 quarts
- M50 engine: 11 quarts
- M60 engine: 13 quarts
Standard Bleeding Procedure
- Switch the ignition to the second position. Do NOT start the engine
- Set the heater to 32C on both sides, fan at lowest speed (but not OFF)
- Loosen the bleed-screw (two turns)
- Pour the coolant mixture into the expansion tank. If coolant begins to overflow, fit the cap and tighten the bleed-screw, then give the upper radiator hose a few squeezes, remove the cap and loosen the bleed-screw
- Once you have at least 2.5 gallons in the system, start the engine and position the car facing up on an incline (or drive on a pair of ramps)
- With car cold, turn the key to a run position (do not start the car) and set the HVAC system to 90 degrees. The fan should be on low
- Remove the coolant pressure cap from the expansion tank and the bleeder screws from thermostat cover and expansion tank.
- Begin to pour coolant into expansion tank keeping level near the top of the tank until air free coolant flows from thermostat cover bleeder hole, install the screw and close bleeder
- Continue to fill the expansion tank until air free coolant flows from the bleeder screw on the expansion tank, you will need to keep the expansion tank filled to the top to complete this step. When no more bubbles then install and close the bleeder
- Fill coolant in the expansion tank to near top and reinstall the filler cap
- Now take the car for a 10 minute drive to warm up the engine. Get heavy footed once the engine reaches normal operating temperature. We want to stress test the system
- Park the car and let it cool down to ambient temperature (at least a couple of hours).
- Check the coolant level in the expansion tank. Repeat the bleeding process if the coolant is low or empty
- If the expansion tank refuses to hold coolant, you may have a coolant leak or damaged head gasket
- Monitor the coolant level and temperature for several drive cycles while adding coolant as needed to maintain full cold level. The coolant level should stabilize after a couple of drive cycles
Bleeding Procedure for V8 Engines
Our cars are self-bleeding. This doesn't mean that the system does not require bleeding, it means that the cooling system is easier to bleed.
Fill up the expansion tank with a 50/50 mix of BMW coolant and distilled water. Take off small line running to the top left (driver side) of the radiator. The line in question runs to the radiator nipple located above the upper radiator hose. The coolant level should start to go down, observe the smaller hose for coolant movement and air bubbles. Keep filling the coolant until the coolant flows freely sans air bubbles.
Leave the expansion cap off and start the car. Let it sit for approximately five minutes while checking the temperature gauge. Tighten the clamp securing the smaller line (i.e., bleed line) to the radiator and let the car run until the temperature needle hits the center. Squeeze both upper and lower radiator hoses multiple times to remove trapped air.
Secure the expansion tank cap and observe vehicle temperature for another 10 or so minutes.
Motor mounts
Overview[edit]
We will cover replacement of engine mounts for M60B30 and M60B40.
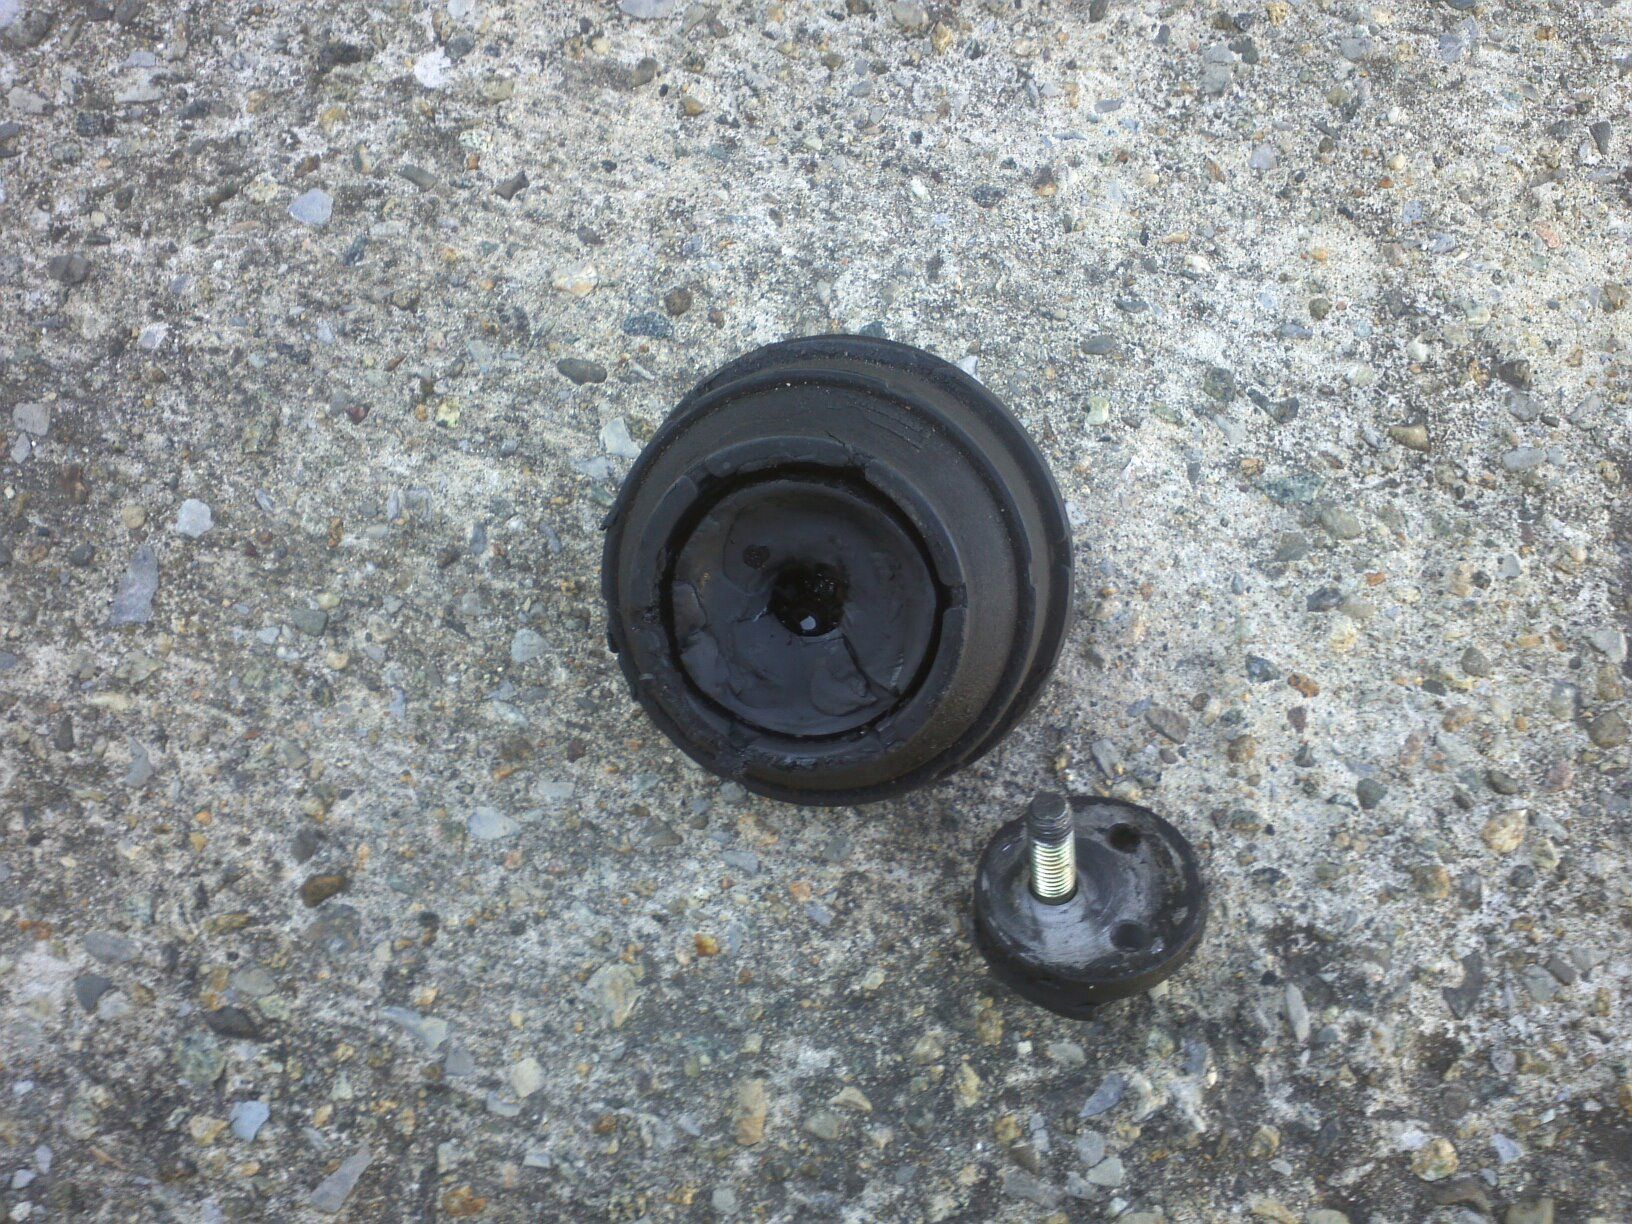
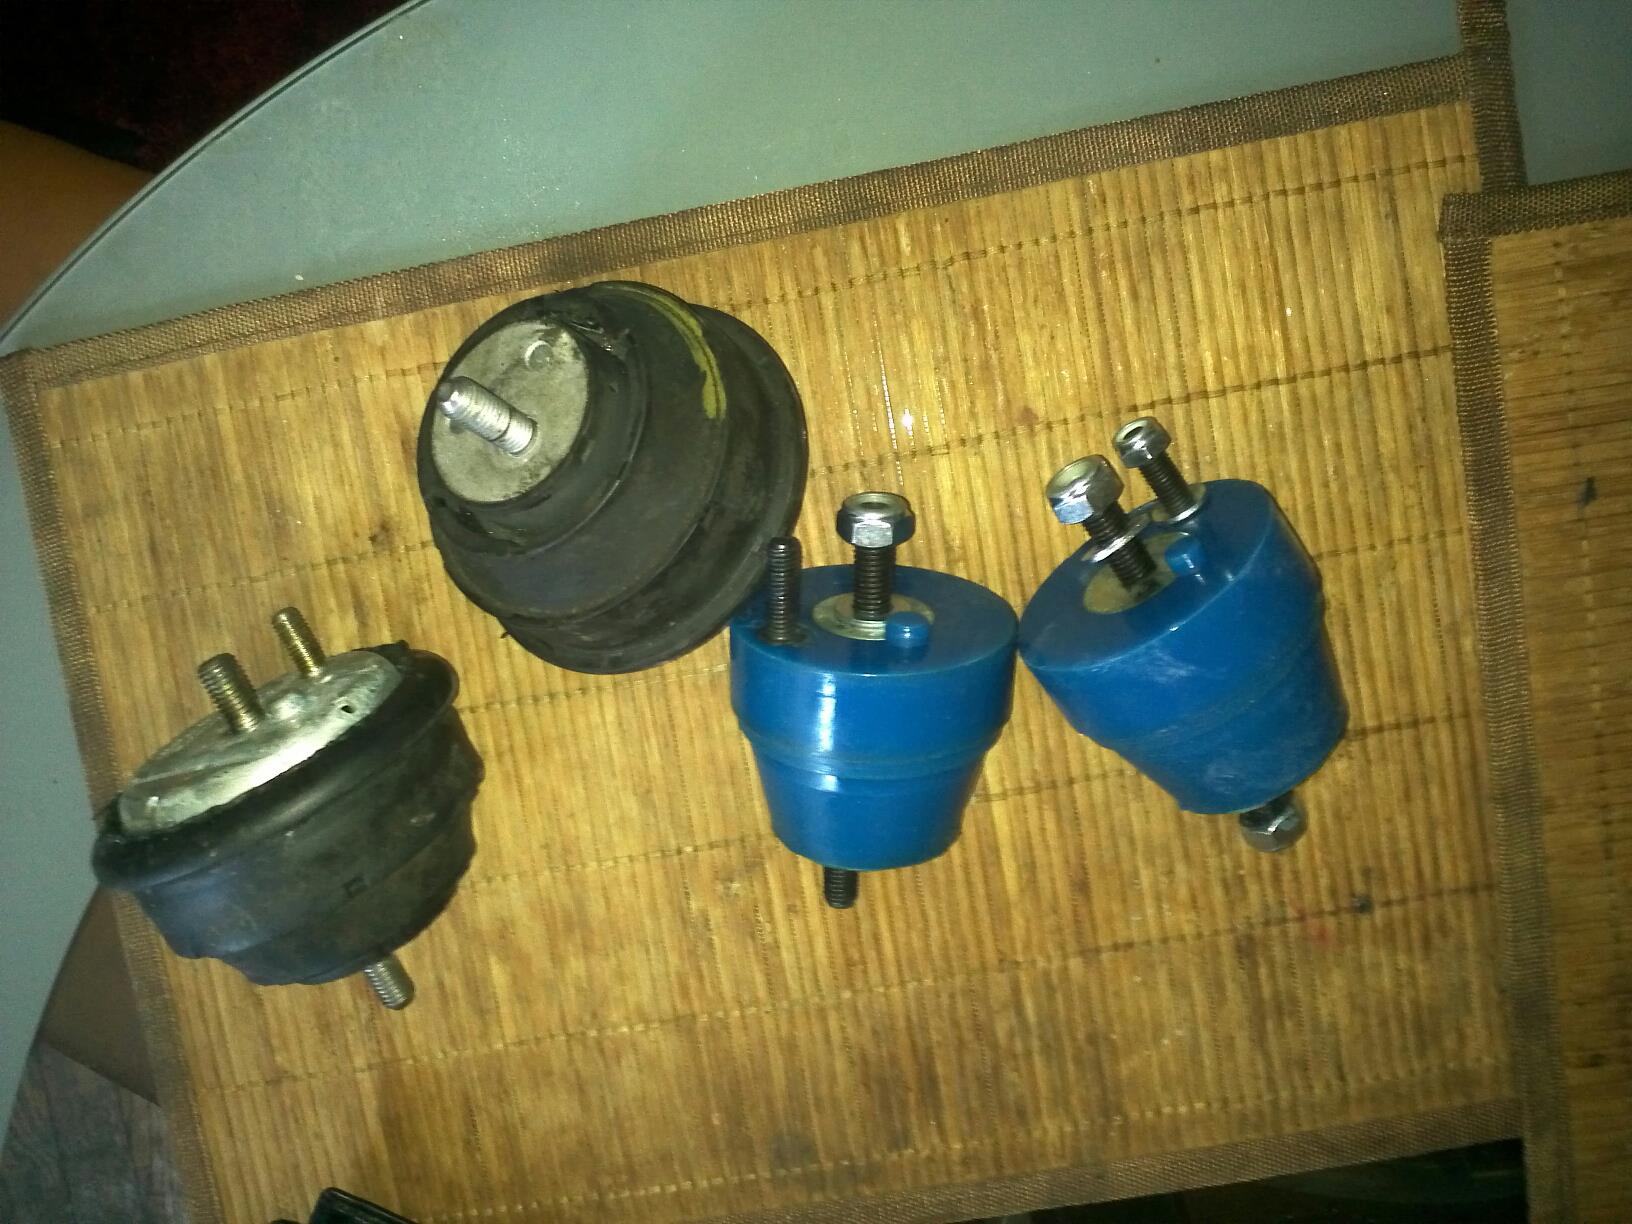
Stock Mounts .vs Polyurethane[edit]
Stock, oil-filled motor mounts are not suitable for aggressive driving and tend to have a very limited lifespan.
Polyurethane mounts in 80A rating from RevShift are recommended as a plug and play replacement.
Accessing[edit]
Each motor mount has 3 bolts, two on the bottom of the mount and one bolt on the very top. All of the bolts, except the top driver side bolt are easily accessible.
There are many guides on how to reach the driver side bolt. Here is our take:
- Unscrew coolant reservoir and move it to the side.
- If you have a fan shroud, remove it, and carefully slide it out
- Remove the stock air filter box
- Put the front of the car on jacks
- Pull the handbrake and put the car in the first
- Choke the rear wheels for safety
- Get a wooden 2x4 plank and another jack
- Remove the bottom bolts from the both mounts
- Put 2x4 under the front of the oil pan and jack up slowly
- Use a flashlight to check the top bolt on the driver side
- If you cannot reach it, inspect the clearance and jack the engine higher
- You will need to raise the engine by 3 to 4 inches, at that point the clutch fan would be above the radiator
- Use a 17mm socket with swivel and a long extension to remove the top bolt once you see it
Replacement[edit]
- Put new mounts in place and secure the top bolts by hand. If the new bolts are not self-locking, use blue thread locker to keep them nice and tight
- Use your extension and socket from the top to tighten up the bolts
- Slowly drop the engine. Your engine mounts should now be in place
- Screw 2 bolts on each mount under the car
- Take it for a spin
Power steering pump
Troubleshoot power steering
Symptoms
- Steering might feel fine for few hours after installing the new belt, then it begins to squeal/kickback as you attempt to turn the steering wheel. This will tend to happen during a complete stop or at a low RPM range.
- No symptoms when car is in full motion
Causes
Harmonic Balancer
One of the most overlooked parts that might cause your steering problems is a harmonic balancer. Most mechanics will suggest replacing tensioners, belts, pumps and even rack pinions before narrowing this problem down.
Loose V-Belt / Bad tensioner
A worn out v-belt or an improperly tensioned belt will omit similar symptoms. The tensioner should also be inspected and replaced.
Worn Out Idler/Adjusting pulleys
It's always a good idea to inspect your idler and adjusting pulley.
Low Power Steering Fluid
Check the level of your power steering fluid (black canister near the fuse box (driver side). You may have an undiagnosed leak within the system, or just need to add bit more power steering fluid.
REplacement
The only thing you will have to worry about is aligning the power steering lines without stripping the pump's threads.
Instructions[edit]
- Use a pump to drain all the fluid out in a container from power steering reservoir, make sure you have new CHF fluid
- You can also replace the V-Belt during this job
- Jack the car up in the front and secure it on jack stands
- Position the drain bucket under the power steering pump
- Open the drain with a hex socket and let the fluid pour out
- Close the drain
- Remove the big power steering line from the rear of the power steering pump. Expect additional fluid to pour out. Careful, this fluid does not like paint
- Remove the smaller line from the side of the power steering pump. The bolt holding this hose is 17mm
- Remove two bolts that are holding the pump in the front. Use a small extension or a wrench for this
- Remove the long bolt that holds the top part of the pulley and extends all the way to the back
- Carefully slide the pulley off towards the radiator and take it out
Installation / Aligning Hoses[edit]
Warning: Please see the alternator and power steering replacement warning!
You will most likely have problems with alignment of the power steering hoses while torquing down the bolts. Use a carb cleaner or warm soap and water to clean all of the areas. We want to prevent the dirt particles from getting into the system. Clean conditions also help with spotting the leaking fluid.
DO NOT USE ANY TOOLS WHEN TIGHTENING IN THE BANJO POWER STEERING BOLTS -- HAND TIGHTENING ONLY or you will risk of stripping the threads on your $400 pump.
The banjo bolts should not offer any resistance if the alignment is correct.
YOU SHOULD BE ABLE TO TIGHTEN THE BOLTS BY HAND WITH EASE UNTIL THE POWER STEERING LINE IS FLUSH AGAINST THE PUMP! IF THERE IS ANY RESISTANCE STOP, THE BOLT IS NOT ALIGNED, OR THE STEERING LINE IS PULLING TOO HARD TO A CERTAIN DIRECTION
- Try to position pump in place and let it hang slightly on the top of the long threaded bolt. This should make the alignment easier
- Start with the rear (bigger) line and align the pump until it is flush with the line
- Use your hands to tighten the bolt
- If the bolt is not straight, the line is not correctly aligned. Start over
- If there is too much resistance and you cannot turn it by hand, try pushing the line to a side. This should relieve the pressure off the bolt
- Repeat the steps for a smaller line that connects to the side of the pump
Bleeding[edit]
- Put the new fluid in the reservoir and leave the cap off
- Start the car and carefully check for the leaks
- Put the steering wheel all the way to the left, wait 1-2 seconds and steer all the way to the right. Hold for another 1-2 seconds
- Repeat this four to six times
- Check the fluid level and top up if needed
- The fluid should be relatively bubble free. The bubbles indicate that there is air in the system
Torque Specifications[edit]
- Pulley to the power steering pump (a total of 3 bolts): 15 Nm
- Front bolts connecting the power steering pulley to the engine: 25 Nm
- The big power steering line in the rear of the pump: 45 Nm
- The smaller power line on the side of the pump: 42 Nm